Making a Bolster Pillow with Insert


This was such a fun project! Not only because I made a neck pillow for my husband to use while he watches TV, but I used over a pound of fabric scraps as the filler. Otherwise, that would have been thrown in the trash. I will tell you how I made this pillow, but you can easily modify how to attach the zipper and how big you want your pillow. Not crazy about having to cut circles? Don’t worry. I have created a free circle template you can use. Click here to get the template (you will receive a download link by email after you complete checkout. It’s free!). Once you get it you can print it, cut it out and pin to your fabric to use as a guide to cut your end piece circles.
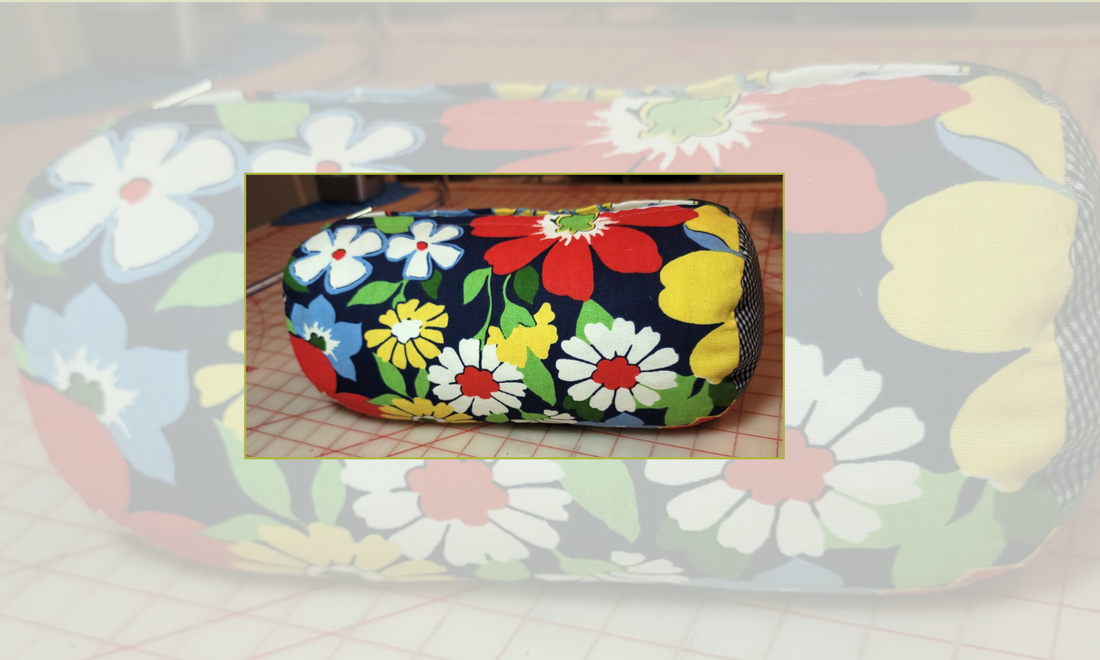
I made the exterior pillow and the insert bolster pillow out of deadstock fabric. The insert pillow was filled with fabric scraps that I have saved from my other projects instead of the traditional fiber fillers or batting. As a sustainable process that I have in my sewing studio, all fabric scraps and threads that I cut are kept and used in other projects. This way, the amount of trash produced in the studio is minimal. I used a little over a pound of scraps to stuff the pillow insert.
The finished measurements are:
- Ends diameter: 6 inches
- Length: 12 inches
- Around the bolster: 19 inches
- Amount of fabric diverted from the trash: 1 pound 14.8 ounces! Yay!
This is what you need to make the bolster pillow. You can certainly modify the measurements per your needs. The circle template available to download goes with these measurements. I used three different fabrics for the bolster; the exterior body and circles (end pieces) and the third for the insert but you can just use the same fabric for all parts.
You need:
- 12-inch zipper #5, plastic coil
- Main body fabric
- Insert body fabric
- Fabric for the end pieces circles
- End pieces circle template, if you need it is available for download.
- Fabric scraps to use as filler or traditional filler
I used a ½ inch seam allowance.
Step 1: Cutting
- Cut 1 main body exterior fabric 14 inches by 19 ½ inches.
- Cut 2 main fabric circles per template (7 inches diameter).
- Cut 1 insert body fabric 14 inches by 19 ½ inches.
- Cut 2 insert fabric circles per template (6.5 inches diameter).
- Optional – Neat or finish all seams with a serger before stitching the bolster.
Step 2: Prepare and stitch zipper to main body fabric
We need to create the cover (flaps) and opening for the zipper or instead you can stitch a top edge zipper if you prefer, it’s easier than a covered zipper.
- On the short side of the exterior fabric, mark 1 inch from seam towards the center on the wrong side of the fabric. Also mark the center by folding in half. Mark the center of the zipper.

- Stitch wrong sides together using a regular 2.5 stitch length from the seam up to the 1 inch mark. Secure the stitch. Then change the stitch length to basting (about 4.0 stitch length). Continue stitching until you reach the other 1 inch mark. Change the stitch length back to 2.5, secure the stitch at the start then continue to the end.

- Iron or finger press the seams open.
- Place the zipper centered between the 1 inch marks on top of the sewn stiches with the seams open. The zipper stops should fall where the basting stitches are. You can stitch the zipper from the right side or wrong side of the fabric; I did it from the wrong side so I can see the placement of the zipper. You can pin the zipper or hand baste the zipper in place before taking it to the sewing machine.

- Starting stitching the zipper from the end where the zipper tape is (where the 1 inch mark is), continue all around creating a rectangle securing the zipper and avoiding the metal parts of the zipper. Go slowly so you can manage the fabric. Make sure that the zipper is centered and that the zipper teeth are aligned with the basting stitch. Move the zipper pull so you can continue stitching (a little tricky to move the pull because of the basting stitches but it’s possible). You might need to create a nest in order to reach and be able to sew the zipper to the main body fabric.


- Remove the hand basting stitches that secure the zipper.
- Use a seam ripper to remove only the basting stitches carefully exposing the zipper.

Now you have a cylinder (main body).
Step 3: Sewing the circle end pieces to main body cylinder
- Open the zipper to the middle.
- Turn the exterior cylinder inside out.
- Place circle ends matching seams with exterior main body and sew in place. Do this for both sides. You can use a ¼ inch seam allowance. Trim down the seams if needed. You can also finish the seam with a serger. Turn right sides out.

Step 4: Sewing the insert pillow
- Sew the short side of the main insert body fabric leaving around 6 inches opening in order to stuff the pillow.
- Sew the insert circle end pieces to each end.
Step 5: Stuffing the pillow insert
- Place the pillow insert inside the main bolster. Align the insert opening to the zipper opening.
- Fill the insert with fabric scraps or fillers.
- Once it’s full, close the opening with a ladder stitch by hand.

Making the insert separate from the exterior body of the bolster gives us the ability to wash the pillow cover.
I hope this project gives you the inspiration for your next project, or to save those fabric scraps instead of throwing them away!